THE OBJECTIVE

The objective is to find a technical possibility of implementing Fitness tracking solution using Java technologies and existing API available on public Web. The main functionality is recording an object’s moves.
When the service is to be used, it is important to install a mobile application provided by a third-party service which will record all the moves and broadcast to the remote service.
EXISTING SOLUTIONS FOR TRACKING
During the investigation of tracking solutions available on the public Internet we have found the following services that provide such services:
- Fitbit;
- Misfit;
- Moves App.
Many services do support their own developer APIs to interact with the services data in own applications, products and services.
Almost all services use OAuth as an authorization method.
FITBIT

Fitbit helps to deliver results
Fitbit service uses OAuth 2.0 authorization mechanisms. This service provides API services for receiving a summary of activities, tracks and the activity log.
These services have their own proprietary implementations as seen from descriptions.
MISFIT

Java saves the time
Misfit uses OAuth 1.0 version. It provides API services for interactions of user applications with its services. Services cover receiving similar information as Fitbit.
MOVES APP

Moves App is one of the tracking technologies available in the market
Moves App service authentication uses OAuth 2.0 standard for authentication purposes.
It provides API services for receiving a summary of activities, tracks and the activity log.
We will take the advantage of this API and interact with Moves App in order to record, get the latest positions and history; further, we will display the latest position and the history in a user-friendly manner.
The intention of this effort is to demonstrate the use of Java technology for this purpose, within the continuous integration (CI) environment.
Moves App platform is well suited for collecting data of human movement activities and is a platform designed for everyday use. It deploys a mobile application that collects the information about users’ moves, transportation and other activities, and stores the history of all users’ activities. The history is available upon request using the provided API.
It provides the mobile application which takes advantage of this.
DOMAIN OF OUR APPLICATION
The domain of the application is fitness movement tracking using the Moves App and interface.
WHAT ENVIRONMENT DO WE HAVE?
As version control system VCS we use Git. As CI build system we use Jenkins as it has proven itself as a stable and mature build service.
LET’S START – CREATE AN APPLICATION
We will show how simply we will get our new java application done using our infrastructure.
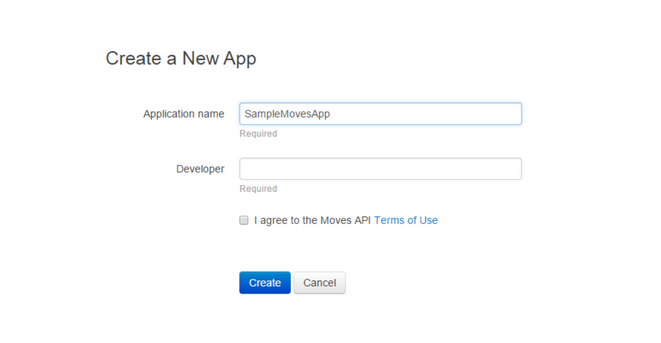
Let’s choose the name: “SampleMovesApp”
Step 1.
In order to use Moves App API services, it is important to register your application on the web site of Moves App. It is done on the website Moves App in the section Connected Apps.
Link for your applications on Moves App

Then you add your application. Upon adding the application you will get issued your client ID (clientId) and your private secret key (clientSecret); this information is to be used during the authentication with the Moves App service.
After the successful authorization with the Moves App, your application gets a grant code.
Step 2.
Download moves-java – a library from Moves App that already has all interfaces to work with Moves API.
Step 3.
Using Maven we create the project and add the dependencies to that: the first one is for authorizing, the second is for working with Moves and the third is for tests.
<dependency>
     <groupId>org.apache.oltu.oauth2</groupId>
     <artifactId>org.apache.oltu.oauth2.client</artifactId>
     <version>1.0.1</version>
</dependency>
<dependency>
     <groupId>me.pims.moves</groupId>
     <artifactId>moves-java</artifactId>
     <version>0.1</version>
</dependency>
<dependency>
     <groupId>junit</groupId>
     <artifactId>junit</artifactId>
     <version>4.12</version>
</dependency>
<dependency>
     <groupId>org.mockito</groupId>
     <artifactId>mockito-all</artifactId>
     <version>1.10.19</version>
</dependency>
Step 4.
Moves App uses OAuth2 for authorization. Before proceeding to use OAuth2 we need to receive a Grant Code from Moves App by performing a request on the endpoint of the part of Moves App API and provide your client ID and client secret. In response, you will receive the grant code. After you receive your grant code, it is possible to use OAuth2 to request an access token. You must have a valid access token before being able to use the API, (please, see authentication on how to obtain an access token).

Then we create a connector with all the important business methods for getting the necessary summary data.
public void start() {
     assert !isStarted() : "Already started"
     String token = getToken();
     this.moves = new MovesBuilder().setToken(token).build();
}

public void startWithMock(Moves movesMock) {
     assert !isStarted() : "Already started";
     this.moves = movesMock;
}

public List<Summary> getSummary(String fromTime, String toTime) {
     assert isStarted() : "Not started";
     return moves.summary(fromTime, toTime);
}

private String getToken() {
    assert code != null : "Code not set";
    if (token == null) {
        try {
            OAuthClientRequest request = OAuthClientRequest
                    .tokenLocation("https://api.moves-app.com/oauth/v1/access_token")
                    .setGrantType(GrantType.AUTHORIZATION_CODE)
                    .setCode(code)
                    .setClientId(clientId)
                    .setClientSecret(clientSecret)
                    .buildQueryMessage();
            OAuthClient oAuthClient = new OAuthClient(new URLConnectionClient());
            token = oAuthClient.accessToken(request).getAccessToken();
            log.info("Access token: " + token);
        } catch (OAuthSystemException e) {
            log.error("System error authorizing using oauth", e);
        } catch (OAuthProblemException e) {
            log.error("Problem authorizing using oauth", e);
        }
    }
    return token;
}
Step 5.
Let’s cover code by Unit Tests. Below is an example for keeping the work errorless:
@Test
public void testSummary() {
     when(connector.getSummary(new Date())).thenReturn(new ArrayList<Summary>());
     when(connector.getSummary(new Date(), new Date())).thenReturn(new ArrayList<Summary>());
     when(connector.getSummary("", "")).thenReturn(new ArrayList<Summary>());
     when(connector.getSummary("")).thenReturn(new ArrayList<Summary>());
     when(moves.summary("")).thenReturn(new ArrayList<Summary>());
     when(moves.summary("", "")).thenReturn(new ArrayList<Summary>());
     connector.getSummary("", "");
     verify(moves, times(1)).summary("", "");
}
Step 6.
@GET
@Path("/weekly/summary")
@Produces(MediaType.APPLICATION_JSON)
public String weeklySummary(@Context ServletRequest request) {
     Calendar calTo = Calendar.getInstance(TimeZone.getTimeZone("GMT"));
     Calendar calFrom = Calendar.getInstance(TimeZone.getTimeZone("GMT"));
     calFrom.add(Calendar.WEEK_OF_MONTH, -1);
     return summariesToJson(MovesAppSingleton.getInstance().getConnector().getSummary(calFrom.getTime(), calTo.getTime()));
}
Step 7.
And as the last step we create Sencha (extjs) web table that shows the summary of Moves:
Ext.define('Activity',{
     extend: 'Ext.data.Model',
     fields: [
         'date', 'name', 'duration', 'steps', 'distance'
     ]
});

var store = Ext.create('Ext.data.Store', {
     model: 'Activity',
     autoLoad: true,
     proxy: {
         type: 'ajax',
         url: '/ihealth/rest/moves/weekly/summary',
         reader: {
             type: 'json',
             rootProperty: 'items'
         }
     }
});

var grid = Ext.create('Ext.grid.Panel', {
     store: store,
     columns: [
         {text: "Date", width:120, dataIndex: 'date'},
         {text: "Name", width:120, dataIndex: 'name'},
         {text: "Duration, s", width: 120, dataIndex: 'duration'},
         {text: "Steps", width: 120, dataIndex: 'steps'},
         {text: "Distance, m", width: 120, dataIndex: 'distance'}
     ],
     forceFit: true,
     height: '400',
     split: true,
     region: 'north'
});
Let’s check CI status:

Five out of five our java Unit Tests are done great.
The most pleasant thing is that when we commit a change to our Git, the infrastructure builds the application and deploys that to our application server automatically and we can see the result:

Any Java developer will spend no more than a few hours to implement the application like that when all development infrastructure is well organized.
CONSLUSION
The tracking service can be implemented by using services provided by API available in the market. With the help of correctly configured software development infrastructure, CI environment and management tools the coordination of development, transparency and change management can be done and solution can be delivered in time easier.
Any company who has java developers or any Java developer can easily use our examples to check how it works.
