NODE JS project with NoSQL support
So, you’ve greeted the world with your Node.JS console, and think of taking on a “real” challenge? Well, here’s one: weather forecasters lie, cheat and use linear splines where a Lagrange polynomial is clearly needed. To help with this, we are going to create a weather forecast aggregation service (“Aggregator” for short). The Aggregator will collect temperature forecasts for upcoming days, and hourly temperatures throughout the day to compare them against. That way we can tell which forecaster lies the least. The technology used to implement the service is Node.JS and TingoDB. We’re also going to use the WebStorm IDE because it allows for easy debugging.

Note that although we are going to make one project today, logically it will consist of two separate parts:
- A background service, which will collect forecasts from external sources (and notify the administrator about its current status);
- And Simple front-end website, which will allow downloading the weather forecasts as XML-file.
Finally, it’s better to develop good coding habits early, so we’re also going to:
- Make tests for incoming data format validation,
- Use a NoSQL database to store forecasts from different external services, since it’s a better fit for the task at hand.
- Make a Website to better present the accuracy and reliability of forecasts. (Since our readers find websites so easy to write, we will waste as little of their precious time on the topic as possible)
1. Setting up WebStorm and creating a new project
I’m going to quickly run through setting up the environment, so feel free to skip this chapter if you know how to do it.
First of all, you’ll need Node.js for this project. We’ll also use WebStorm. Though you can use any IDE of your choice (or none at all), all the illustrations will be for WebStorm, and we recommend that you get it.
The WebStorm IDE doesn’t require any special preparation to use. Simply click on File->Open, select a directory for your project from the tree (figure 1) and all the files in the selected directory (and its subdirectories) will be considered part of your project.

Next we need to configure a debugger for node.js. The command Run->Edit Configuration allows us to create debug configurations for application and test development.

Select the path to the node interpreter (that’s where you installed node.js), the path to the working directory and the main file to execute. During development, you can switch between debugger configurations to launch different source files.

2. Project configuration
If you read the previous chapter, you might already be wondering why I didn’t mention installing a database, or for that matter a web server. That is because Node.JS will helpfully do this for you. The reason it can do so is that you have a Package Configuration file, (called “package.json”). The file contains the following information:
- name – project name;
- version – version of the project;
- author- the most important field 😉
- contributors – a list of people who helped out.
- main – filename of the main executable file of a project;
- dependencies – a list of Node.js packages required to run the application.
- devDependencies – a list of Node.js packages which are being used during the development process, but won’t be needed by the end user. Neat, huh?
2.1.Example of package.json
Here’s what ours will look like (again, you can safely skip ahead at this point, if you’ve already familiar with the material):
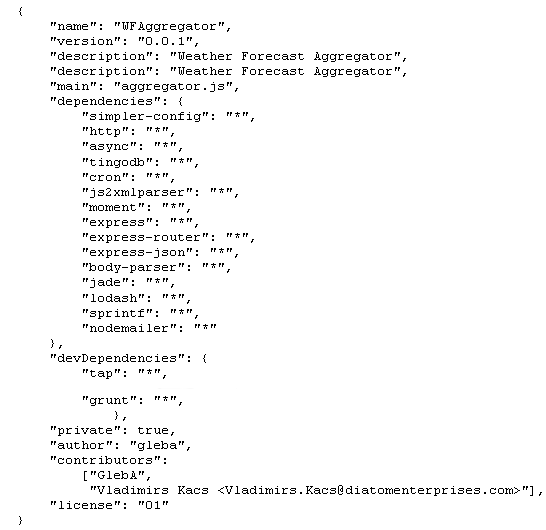
And here’s a rundown of the more important packages it mentions:
2.2. Tests
To be able to launch tests two primary Node packages will be used: the tap (Test Anything Protocol) test framework and the grunt tests execution environment.
2.3. Website framework
We will use Node.js Express 4 framework for the website. Also, we will need to generate a web page, which means we have to choose a view engine. We’ll use Jade. (But you can use whichever framework you enjoy most, it will not affect our project in a significant way)
We’ll use the Node.js packages express and jade.
2.4. Database
We don’t want to lose data we get from external services, which means that we have to store as close to its original form as possible. The problem is that various external services send us data in different formats. The solution is to use a NoSql database, like TingoDB (though hardcore fans of MongoDB can use that with minimal changes). This is the tingodb package you saw earlier.
2.5. Package request
Once the package.json is configured, all you have to do is open your project folder (the one where package.json is) and type in npm install this will get you all all the dependencies.

After the command is executed new folder node_modules is created. In case you’re wondering, that folder contains all Node.js packages enlisted in dependencies and devDependencies sections of package.json file.
3. Project Outline
3.1. Get the data
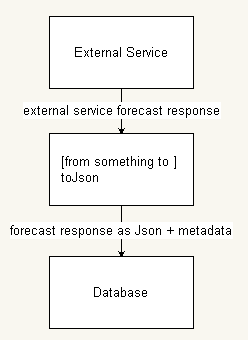
The Aggregator will request data from external services, the response with forecast information will be transformed to Json-format and metadata is added. We’re going to need a separate toJson procedure for each external service. Finally, the result is stored in the database:
3.2. Present the data
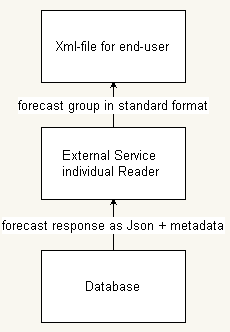
After a User selected data range and requested forecasts from the database, Aggregator reads records from the database and transforms forecast of each record individually to the standard format. Each external service, registered in Aggregator, has individual Reader.
3.3. Summary
To be able to handle forecasts of external service, Aggregator has to have:
- Appropriately configured config.json file
- Individual to Json function implemented – this function converts external service response to Json-format. This function is called in the background when Aggregator requests external service;
- Individual Reader function implemented – this function converts external service response in Json-format to the standard format. This function is called when User requests Aggregator for forecasts.
4. Teaching to the test
Since we’re going to follow the TDD methodology, the first thing we’ll do is write tests for what we want our component methods to do.
4.1. Basics
As I already mentioned, we’ll be using TAP to write tests, so we’re going to need to include it in all our test scenarios:
![]()
The basic structure of a test scenario is that it has a named batch (or several), containing named tests, which check (or as some people say “assert”) results against expected values. F.e.:
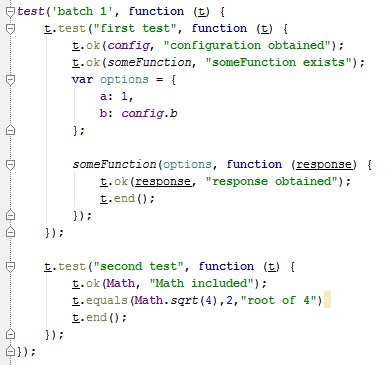
The first test checks if the asynchronous function someFunction() exists and that it doesn’t crash with our settings. The second test checks if the Math module is loaded, and that the synchronous function Math.sqrt() does what we expect it to do.
In the end we get a neat summary of which tests passed, and which failed, and why it happened:
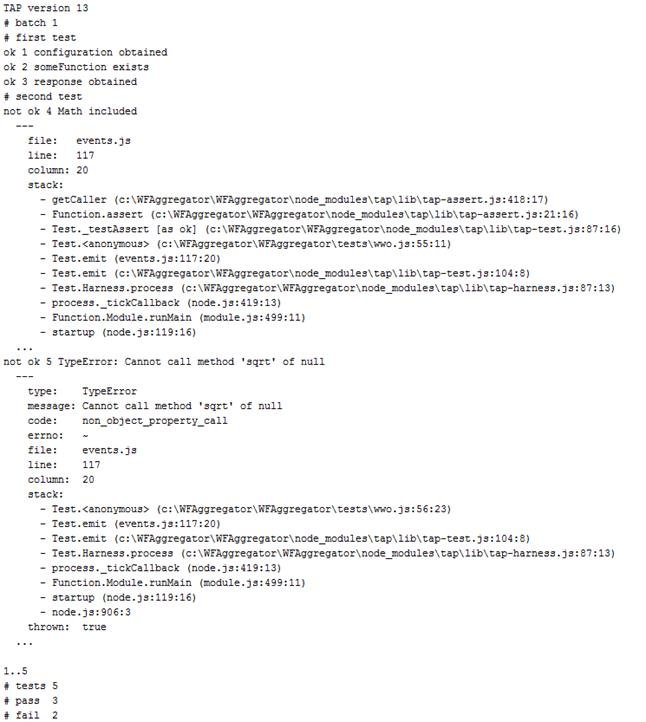
It seems like the Math module ‘got’ corrupted. (“How could that happen?!” I hear you cry. Nobody knows >:] But now we know where to look.)
4.2. A tested coming in
As you might remember, getting the weather data consists of 3 steps: reading the weather from an external source, encoding it as JSON, and saving it all to the database.
4.2.1. Reader tests
So how do we know if a reader is getting anything? By running it, of course! If it runs, returns something and that something is in the expected format, then we can be fairly sure it works correctly (there’s always the question of the external service being buggy, but that is not something we can affect, so we’re just to have to trust them).
First we’ll need to get the module itself and its configuration files:
![]()
Then we should see if it’s valid, and that it returns something, so our basic test should look a little like this:
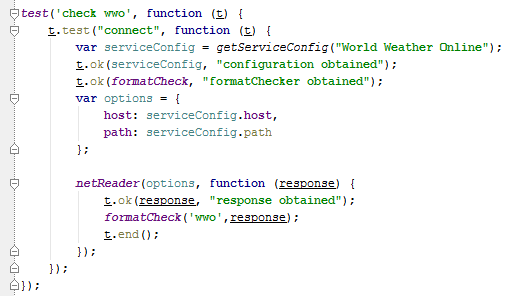
We should also test error reporting:
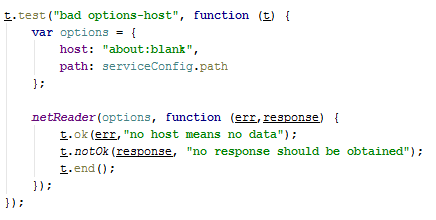
If we have more than one weather service (and we do), they should only differ in configuration and checker functions.
4.2.2. Encoder tests
Along the same lines, we want to write a test for the encoder and database. I will leave these as an exercise for the reader.
4.3. Tested going out
Tests for the XML maker. Cut for time.
5. Making stuff work
If you run any of the tests now, you might notice that none of them pass (this is good, actually- it means our tests work). We need to make the methods themselves.
5.1. About the configuration file
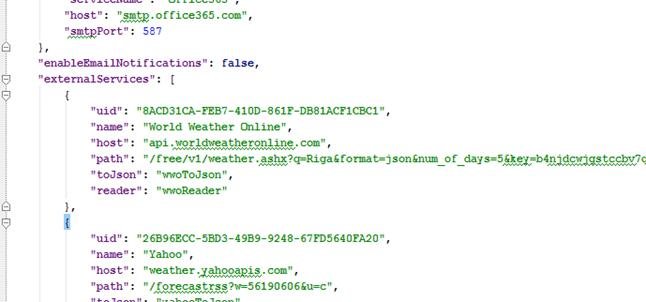
You may have already noticed, that we are using a configuration file so that settings could all be kept in one place and changed without restarting the service. To make using a configuration file easier, we’re also including the simpler-config package. It allows us to easily get a config object in any module:
![]()
The file itself is written in JSON, and looks something like this:
5.2. Writing a reader
In this article, we are going to write a reader for getting weather from WWO, and leave the other forecasters as an exercise. First let’s look up the API (http://www.worldweatheronline.com/free-weather-feed.aspx ). It seems like in order to get info from a weather service, we are going to need to send it a GET request. Luckily for us, there’s a library for it, unsurprisingly named HTTP:
![]()
Now all we have to do is make the request:
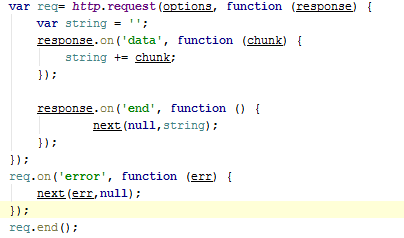
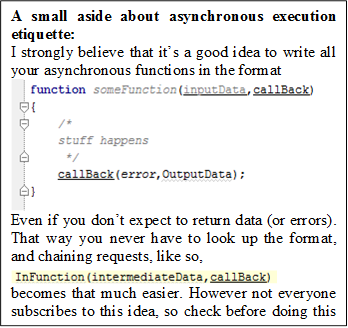
And the response.on(‘end’,callBack) method tells us when we received the last response packet and can start doing something useful with them, safe in the knowledge that we haven’t missed anything. Note that the on(‘error’) event is emitted by the request itself, rather than the response callback.The response.on(‘data’,callBack) method allows us to read the contents of a freshly received response packet.
5.2.1. Putting it to the test
Since we already have tests to figure out if our reader works, we now have to do is run the test, and find out if our code works as expected:
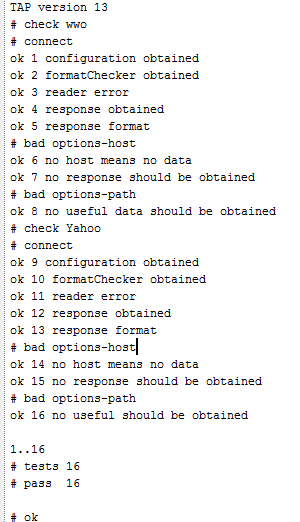
It does.
5.3. Hacking it with JSON
There’s a built in JSON object, which you can use to “stringify” an object into JSON format:

We also included a library for parsing XML into objects (though for WWO specifically it’s not needed)
![]()

5.4. Putting the data in the base
Using tingoDB is quite easy- there’s no need to run servers or design tables. Simply importing the module and setting up environment variables is enough to start working- and inserting automatically creates a table if it doesn’t exist. This makes it perfect for rapid prototyping and small projects.

Now all we need to do, is insert

And select

Database helper is done in under 5 minutes.
5.5. Putting it together
Let’s make a process that goes through all 3 steps and downloads the current forecast into our database.

We’re going to use async to run all reader processes at the same time (they are, after all, mostly about waiting for the external service to return a response):
![]()
For each service we’re going to get the correct options:

Make a JSON with the correct metadata (to ease search):

And send it off into the database:

Finally, since we need this done every hour, let’s set up a cron job (Note to Unix users: in Node cron has precision up to the second, rather than the minute.):
![]()
Let’s launch it:

And here’s what out TingoDB looks like after a couple of days:

Congratulations, you are now a proud owner of a weather aggregator service.

